Wednesday, 16 October 2013

Life Drawing- Year 2 - 1

First life drawing session after the summer break.


Getting back into it, charcoal feels odd to draw with after so long


Starting to get a feel for it again on the 3 minute sketches. Drawing the figure way too wide, this is a probably I seem to have carried on from last year.


Still not quite getting proportions correct


Very difficult 15 minutes of drawing with my left hand (i am right handed) However it turned out reatively nice.


Trying to make the figure less wide, starting to get more confident.


Finally feel like I captured the model in proportion, size and body type. Focused on using stronger edges to bring forward different parts. Using finger to wipe away mistakes and then turn into slight shading.

Thursday, 10 October 2013

Minotaur (on going)

This is a box modelling task. By following a youtube tutorial I started with nothing but a cube and slowly added geometry and form by extruding faces and moving verts.


Starting very simple I created a humanoid form, keeping things very bulky because the Minotaur in the end is very muscular and flabby.


Begining to refine the form. The tutorial kept this much more simple at this stage than what I had but this did not cause me any problems later.


Continuing to refine the form...


...and some more.


This is how far I have managed to get with this tutorial.

I found this task extremely difficult as there is a lot of tweaking to be done, which turns me into a perfectionist and getting stuck on tiny details and following someone using a different software to what I am confuses things at times. For example using split tool shortcuts that we do not have in Max.

I did however learn a lot in how to add geometry without adding too much wasted geometry by creating my own splits in the mesh and turning them into loops.
I also learned that it is possible to change nGon polys into quads, this part I still find tricky at times but now I know it is possible and I can slowly start to figure out how to fix those.

Overall I believe my 3D modelling skills have improved from following this tutorial.

Thursday, 3 October 2013

Fishy - UPDATED

Our first task of the year for this Unit was to create an underwater sea creature.

I knew that I wanted to do a small type of underwater creature much like a piranha but with a twist. So I researched three different types, squid/octopus, shellfish and different types of fish.


UPDATE- I then did several research sketches


UPDATE- My chosen design is the top right fish. It is a mixture between a shellfish, jellyfish and a piranha

.

Next I started to work on a sculpture. I decided to start straight from Mudbox and use the generic sphere shape to start my sculpt. Below is the progression.


I found this process to be very natural to me and enjoyed it greatly. I was able to get enough inspiration from my design to be able to replicate the sculpt very similar to the design. I am not very familiar with Mudbox tools so there was a lot of back and forth with trying one thing to another until I found something that works.

Below is my render using Mudbox Lighting, I simply added diffuse colours to each light. Overal I created three, one on the left and right pointing downward and a very dim light underneath to act as the reflected light.
Because I was running out of time I decided to very quickly use a stock image online for my sea scene.


Render added and photofilter to make both render and background match and added some light beams to match the lighting on my render.


Began to use real life textures to detail


Continued to detail, some painting was used to give detail to the teeth, eyes and inside of mouth


Added several more renders of my fish at different poses to add to the background, I reduced their opacity to make them match.


Tuesday, 23 April 2013

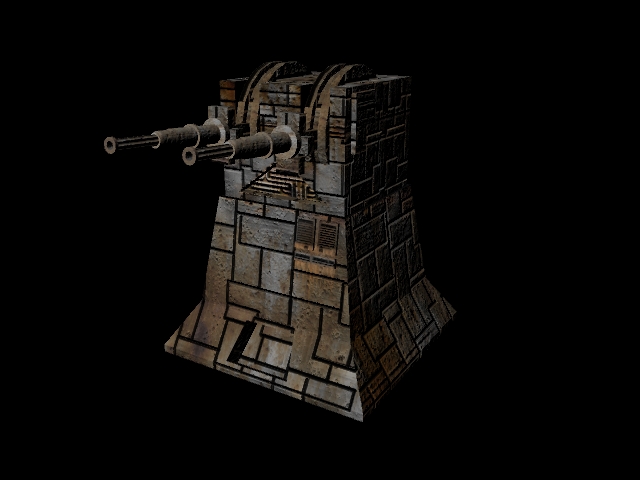
Normal Map Turret

Class task to model, UV Unwrap and then Normal Map turret.
 
At first I did not quite understand the task and went about making a bump mapped turret. I am pleased with the result of this version of the turret which is why I am displaying it.
 
 
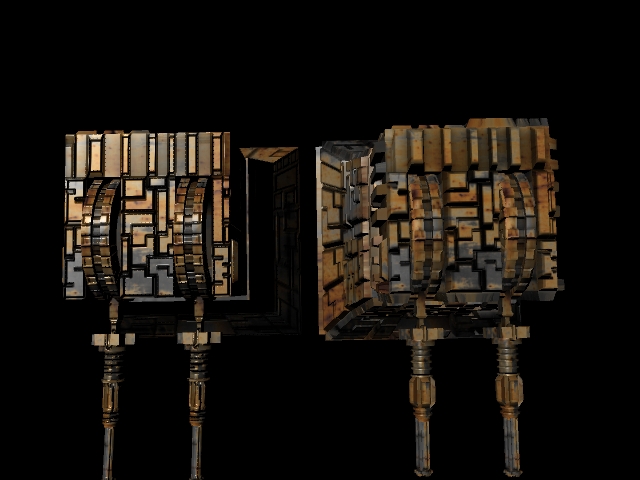
Now moving on to the actual Normal Mapped turret I have created.
 
High poly version on left and low on right.
 
 
High Poly version on right and low poly version on left.

 
High poly on right and low poly on left.

 
Low poly side

 
High poly side.

 
Once I had got the hang of using Xnormal I enjoyed creating this turret.
 
To improve on this I would have liked to have designed my own turret but due to spending so long on creating the bump mapped turret I ran out of time.
I am however still very pleased with the final outcome of the Normal Mapped turret.


CAT Animation

Introduction to CAT animation.
 
To begin with we used the CAT animation provided with 3DS Max, I decided to use a Lizard, Onu and Crab.


This second CAT animation I used the human CAT biped to animate this skeleton.
To do this I added a skin modifier to the skeleton mesh and attatched each skeleton part to the CAT bones and adjusted the weight of vertices accordingly.

Then using the CAT Animation tool I changed the pose, walk and movement of the skeleton while animating.
 

Mudbox

Two sculpts, my first an Old Man's face and second a zombie/ghoul.
 
This is my first sculpt made in Mudbox. I was unfortuantly unable to attend the lesson so I had to work on this on my own with no introduction to Mudbox. However I found it to be a very easy program to pick up and use.


I was not able to finish this sculpt, it was entirely done free hand using reference as a general guide. I was focused on trying to give the face some emotion which I belive I acheived.
 
To improve I need to understand how to create mouths and eyes in mudbox as this is the part that I struggled the most with and spent a few hours tweaking until it looked right.
 
 
This zombie task was to practice correct anatomy. To do this I started by painting a skeleton structure on the basic human model provided in Mudbox by use of stencil and reference and then proceeded to sculpt according to the painting.


I believe that this worked well to make anatomy as close to perfect as possible. However I found it to be extremely time consuming and would have preffered to use a stencil as reference and sculpt by eye as I beleive I can sculpt and make adjustments as I went.